I posted a dashboard to Tableau Public recently that I used as a way of playing around a bit more with dashboard actions and using them to dynamically display images.
I had a need to do this for a client a while back who wanted their customers’ logos to display in a report based on which customer’s name was selected from a filter. It was a bit tricky to work out, and it isn’t 100% seamless, so I thought I’d write up a little tutorial on how this can be accomplished. However, rather than displaying customer logos in a client report, we'll be creating a data visualization of the Store Next Door in the opening credits of every episode of Bob's Burgers. Let's dive in.
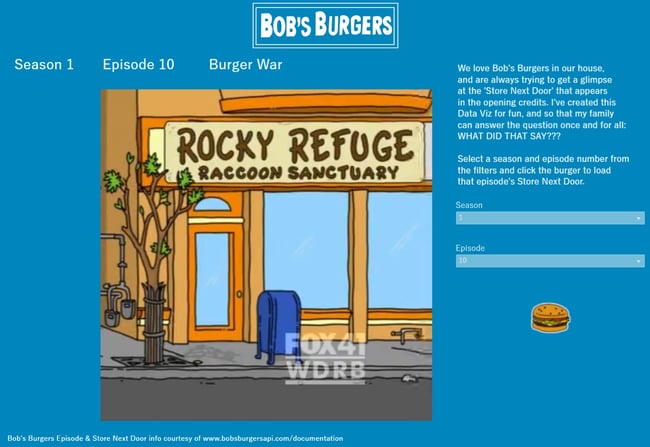
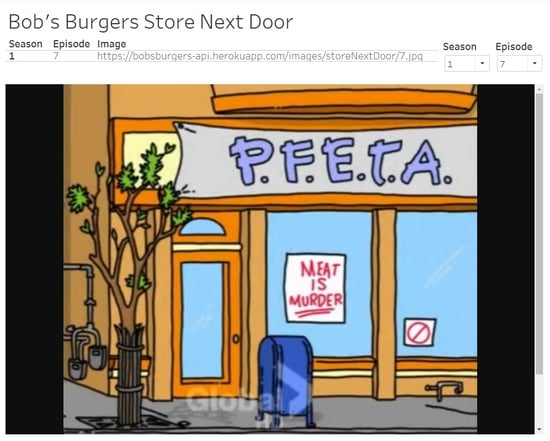
My highly professional data viz based on a cartoon.
Step-by-Step outline / Jump to Section
- Get necessary images hosted on web
- Add Web Page object to display images
- Edit URL Action
- Specify action to initiate filter/change
- Alternative action options
1. Get necessary images hosted on web
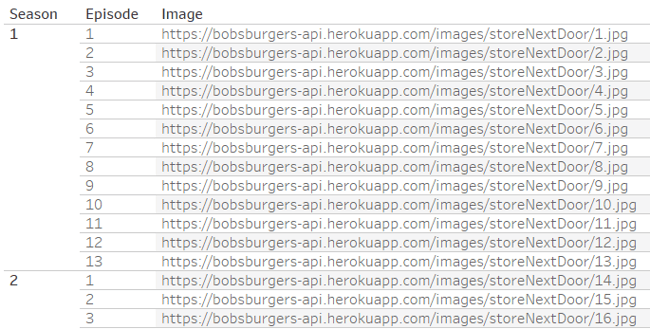
The very first and most important detail is that you’ll need the images you want to use hosted on the web. The action this uses is the “Go to URL” action, so you’ll need URLs for each image included as part of your data source.
2. Add Web Page object to display images
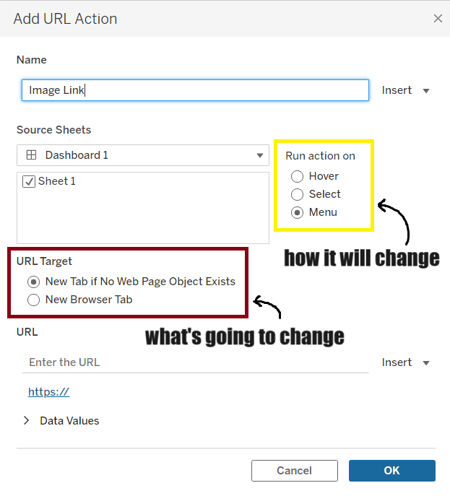
Now, initially, when you create a dashboard and select DashboardActions and select the “Go to URL” action, your options will look like the screenshot below. The section in yellow asks you to decide which action should be taken to load the URL of the image. The section in red asks you to decide where you want the image to display. Both the default options will open your image in a new browser tab.
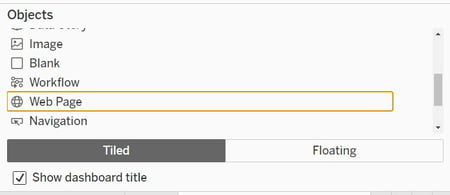
However, we want our image to show up as part of our dashboard, so we’ll have to add a Web Page object in which to display it. You’ll find this object in the left-side navigation under “Objects” when building a dashboard.
Once you’ve dragged a Web Page Object to your dashboard, you’ll need to tell Tableau which web page/image you want to display. In the URL box, paste the link to any of the images in your data source.
Once you click OK, you’ll see the image you linked to in your dashboard.
If you open Dashboard Actions again, though, you’ll see we have a new option under URL Target called “Web Page Object.” Because we have only one Web Page Object in our dashboard, it is automatically selected from the drop-down list. But if you have more than one Web Page Object on your dashboard, you’d need to make sure to select which of them should change when this action occurs.

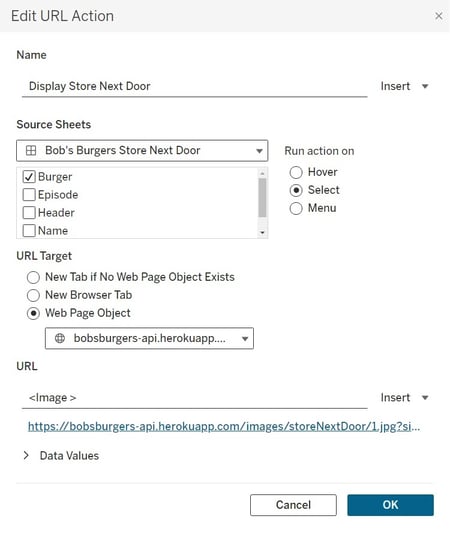
3. Edit URL Action
In the URL field, I’ve clicked the “Insert” drop down and selected a field from my dashboard to use as the URL. I’ve also opted to have the action occur upon select. This is the part that I say isn’t 100% seamless – this is an action. Regardless as to which option we choose under “Run action on”, we’re telling Tableau that something is going to happen to initiate this change. In my sample dashboard, I have a filter to select the season and episode. When a user makes selections from those filters, the worksheet that displays the season number, episode number and episode name will automatically change. The image will not until the action has happened – until I’ve clicked on something in my Episode Name sheet.

To make my sample visualization fun, I added a worksheet that was a cartoon burger. I dragged my image URL field to the canvas, then selected “shape” on the marks card. I had already uploaded this burger image to my shapes repository simply so that I wouldn’t get that odd “Tableau highlighting” that appears when you hover over fields in your visualization. My dashboard action configuration looks like this:
4. Specify action to initiate filter/change
I have my “burger” worksheet selected as the item that should be selected, or clicked, to make the image change based on the filters. I added a little commentary to my dashboard to make it clear a user needs to click the burger to view the corresponding image.
5. Alternative action options
When I created the previously mentioned dashboard for my client, I opted to go with the “hover” action, meaning when a worksheet was hovered over the image would change. I then had a worksheet that displayed just the image URL with the text formatted to be white that I positioned as the background of the dashboard with all other worksheets floating over the top. This way, by chance, a user making selections from the filters would happen to hover over the background worksheet and the image would appear to automatically change. Again, it wasn’t perfect, but they were happy with it.
I hope this is useful! If you’d like to see “behind the scenes” on how these actions were built, download my Bob’s Burgers dashboard from my Tableau Public profile.
Happy vizzing!
Credit https://www.bobsburgersapi.com/documentation for all Bob’s Burgers data.
.jpg)